Protecting Web Traffic with Domino Web Servers
Michael White MCNE, ASE, PCLP
August 9, 2000
It only takes but a few minutes to allow access to users mail, calendar and a variety of databases to web users when that web server is Lotus Domino. Lotus has provided a different password used by Internet users, which is separate from the password used with the Lotus Notes client. This decreases the chance of a captured Internet password being misused. However, many users use the same password for both the Internet access and the direct Notes client access. This means the plain text password in use on the Internet is identical to the one used by the Notes client. Together with the extreme ease for Domino administrators of most skill levels to be able to publish databases, there is a likelihood of many Domino web servers having vulnerabilities.
In this article we will discuss how we can significantly improve the security of information traveling between those web browsers and the Domino servers. This can be done at small expense, and little work for the administrator, and no work for the end users. The end result is better security of information.
The information that follows is based on Lotus Domino 5.0.4 and Verisign, but could be used for other versions of Lotus Domino and other Certificate Authorities. The information and steps below assume that the Domino server is working well and that Web access is already occurring.
The mission is to protect the transfer of information, including passwords between Web browsers and the Domino server, whether that is via the Internet or not.
The first step is to ensure that the Server Certificate Admin application is ready for use. If this database is already created (and it should be) then confirm it has the ACL’s set to None for Default, and Internet Access set to None. The Administrators group should be added with Manager access. If this database is not available, then create it using the csrv50.ntf template and call it certsrv.nsf. Aside from the actual configuration of the server, this database is where we do the most of the work.
Now we need to create the Server key ring. Open the database called Server Certificate Admin. Use the first option to create our key ring. See figure 1 below:
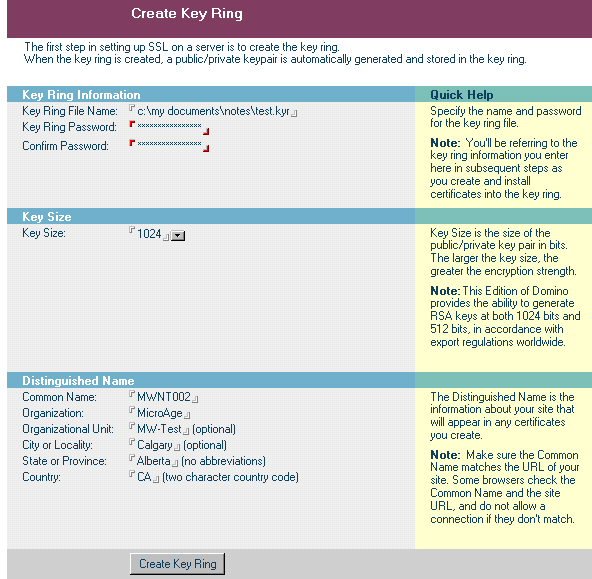
Figure 1 – Creating a Key Ring
You will need to use 12 characters or more for the password. Always use the 1024 key size. In the Common Name field you need to have the exact name of your server, such as www.microage.ca. In this case we see my test server, which is mwnt002 (and is defined not in DNS but in a host table on the machines connected). Organization is the name of your organization (that you work for). The Organization Unit should be your Domino domain. The last three fields are logical. Now use the Create Key Ring button to generate your ring.
It is important to note that two files are created with the name you entered above. One has a file extension of .kyr, which is your key ring, the other with a .sth which is your password. It is NOT encrypted, but merely altered so make sure you protect these two files.
Now we need to request a server certificate. This can be requested from a Domino, or third party Certificate Authority (CA). It is important to note here that if you use a Domino CA then you will need to add a certificate to your web browsers that is in common with the server certificate you added to your server from the CA. This can be more time consuming and more costly then simply purchasing one from a third party CA that your browsers already have a certificate in common. That is why we are using Verisign in this example. All IE and Netscape browsers already have a certificate in common with Verisign. We only need to add one to our server to be complete.
To create the request for the server certificate we use the Server Certificate Admin application again. This time we use option 2. Choosing Option 2 will show Figure 2.
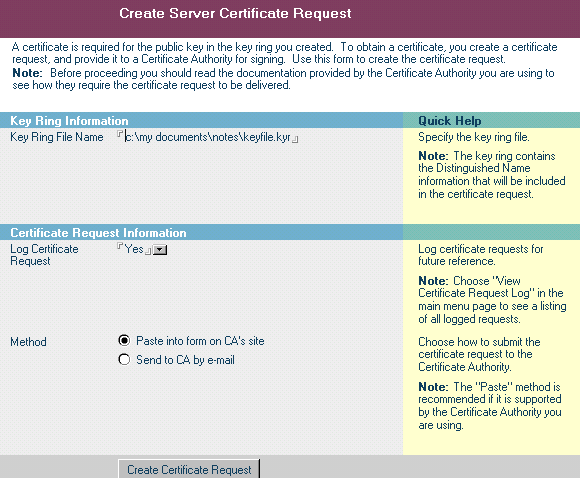
Figure 2 – Create Server Certificate Request
The form should already be filled in correctly but confirm the file name and path of the Key Ring file. Now use the Create Certificate Request button. You will be prompted for the Key Ring password and then you will see Figure 3.
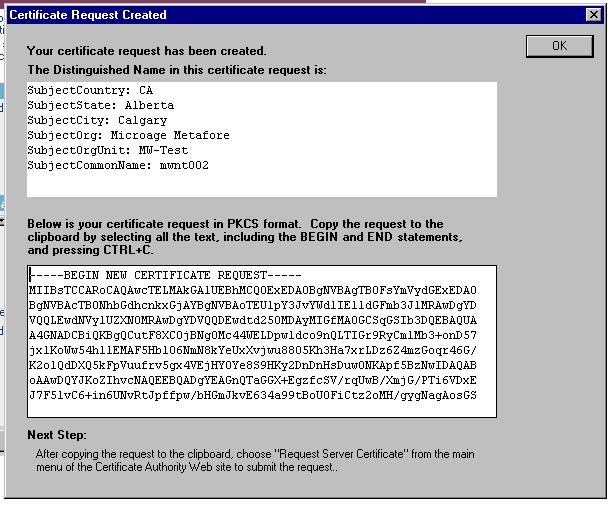
Figure 3 - Certificate Request Created
Examine the screen and insure the top white box shows the correct information. The bottom box is the request we need to pass to Verisign. You can highlight it all with click and drag then use <ctrl – c> to copy it to the clipboard. Now it is ready to paste into the Verisign form. Ensure that you include the Begin and End statements.
Now you need to move to the Verisign web site (www.verisign.com) or to the Canadian representative of Verisign (www.cibc.com/verisign). You pick the kind of server ID you need (we chose Secure Site). You will need to prove who you are. This can be done electronically with a DUNS number, or you can fax business license or articles of incorporation (F: 877/862-2270). At the point where they ask for your CSR, you can use <ctrl – v> to paste in your certificate request that you copied to the clipboard. Once you have completed the process without error, a wait from 2 hours to several days to receive your requested certificate is expected. I should mention that I called CIBC Verisign support (877/291-3111) and asked how long the process would take, and they said that if it was important they would do it right now. It was completed in about 1.5 hours.
When Verisign is finished, they will send you an email and it will contain your certificate. It will look like figure 4.

Figure 4 – server certificate from Verisign
Now you need to copy and paste the certificate into your Key Ring. So once more open the Server Certificate Admin application. Now choose option 4 – Install Certificate into Key Ring. Now in Figure 5 you can see where to paste the certificate you were emailed. Before pressing the Merge Certificate button, ensure that the file name and path at the top of the screen is correct.
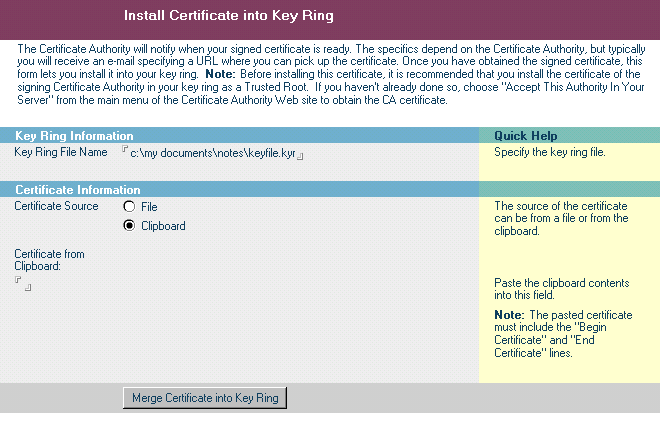
Figure 5 – Installing server certificate into your key ring
Enter the password when prompted. You are now finished with the certificates. You are ready to prepare the server to use them. It is important to remember to copy the two keyfile.* files to the server data folder. Then put a copy of them someplace secure, such as a protected encrypted database, and then wipe them from your local hard drive.
Now you need to work in the Domino Directory, Servers view. Open the server you are going to enable SSL on (and have copied the two key files to). Select the Ports tab, and then the Internet Ports tab. Now in figure 6 you can see that the SSL key file name should already be correct. You can change the SSL protocol version to only support V3.0 of SSL to take advantage of the new features.
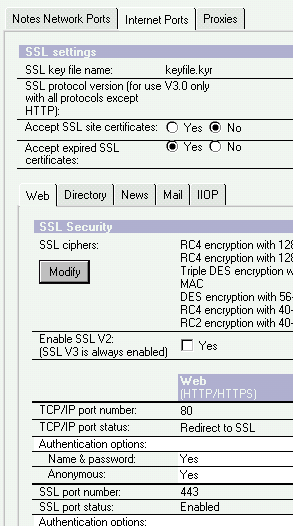
Figure 6 – Port information
At the bottom of the figure you should confirm that the SSL port status is enabled and using the normal port of 443. Both of these should not normally need changes.
SSL has been configured for use, but we aren’t using it yet. One of our choices is to use SSL for selected databases (right click and select Database Properties on each database and check the checkbox labeled Web access: Require SSL connection). If you have the server resources (RAM and processor) you can also use SSL for everything. This is the best choice if possible. To use SSL for everything, use the Domino Directory again, Servers view, and open the server document. Select the Ports tab, and then the Internet Ports. As can be seen in figure 6 above you can set the TCP/IP port status: to Redirect to SSL. This means even if a user connects using a HTTP URL they will be redirected to SSL.
Now the last thing to do is to ensure that the options we have tweaked above in the server configuration are live. This is accomplished on the server console with a tell http quit followed by a load http.
When you connect to this server you should immediately see a small padlock in your lower right corner. This is accomplished without visiting any of your users machines, whether they are in the office or at home, and without any sacrifice of security!
You can quickly and easily add a bit more security. You can use the Domino Directory, Servers view, and select the server. Once again select the Ports tab, followed by the Internet Ports tab. Now in figure 7 you can see two Anonymous options.
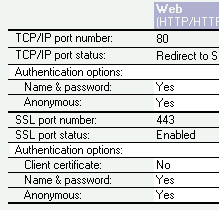
Figure 7 – More security
Ensure that both fields are set to No (above shows the default values for these fields). Once that is done you need to reset the HTTP task by using the tell http quit and load http commands on the server console. Then when you try to connect, before you see anything, you will need to authenticate with the server.
If you implement the above with a testing ID it won’t work quite right. You need to call Verisign support (650/429-3400) and ask them to email you a Trusted Root for the Verisign Testing Authority.
We have looked at implementing SSL for web access to a Domino server. This will ensure that all traffic between your end users’ web browsers and the Domino server will be encrypted. This makes it harder for individuals to capture useful information from your communication sessions.
References
|