The documentation that comes with Lotus Workflow is pretty good, but it lacks a comprehensive do these steps in this order. By running the wizard button in the about document of the sample database and then looking at what happened and reading about in the Lotus Workflow Administrative help, you can basically mine the first half of this document.
1. Sign the LWF database templates with an admin id or the server id with the Domino Administrator.
Open the Domino Administrator.
Switch to the Admin ID (If signing with the admin ID rather than the server ID.)
Switch to the appropriate server.
Click the Files tab.
Switch the view to Templates only (or Databases and Templates, etc.)
Select the LWF based templates (Use shift to select the range. They all start with LWF)
Right click and choose the Sign option. (Or use the twisty on the right and select sign.)
Choose either sign with the current user ID or the server ID.
A dialog box with let you know when it is completed.
2. Create new databases on the server using the LWF templates.
Create one database for each template (e.g. LWF App Tripp on neptun/Adteco)
Only four databases need to be created. The application one to hold the application, the process definition database to hold the processes, an organization database, and a design repository database for reusable components.
Make sure the managers of the processes have all the roles in the application database so they can do the application setup.
3. Setup the Organization database.
Open the organization database and choose Setup under Administration in the outline menu on the left. Create the Organization Setup Document and press save. (You can take defaults.) You can also create the calendar setup document if you desire to have one.
Create Workgroups by choosing Workgroups under Organizational Structure in the outline menu on the left.
Create at least two. So you have some people (workgroups) to workflow.
Switch to the agents view. Enable and choose server for the following agents:
OrganizationCheck
OS LockCheck
OS EXPAND CACHE scheduled
4. Setup the Application database - Create Form and Enable Agents.
Using the Domino Designer, open the application database you created in step 2 above.
Find the Sample form; copy and paste it choosing for the new form to not to inherit from the template.
(In the real world, I would recommend creating the forms outside this database in a corporate forms repository database and pasting them here and choosing during the paste for them to inherit from the corportate forms repository.)
Edit the form's layout to meet your needs.
Save the form with its new name.
Switch to the agents view. Enable and choose server for the following agents:
OS Domino Workflow Backgrounder
OS Administration
OS TimeManagment Backgrounder
The rest of the agents run on schedule never or run manually, and are taken care of via the signing.
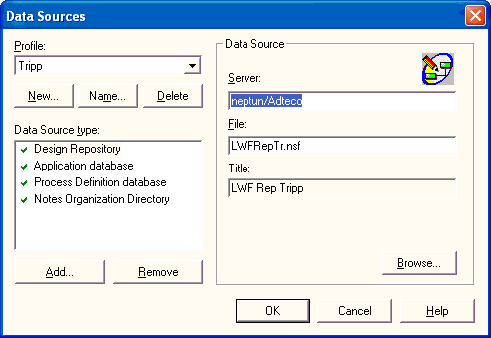
5. Setup the Lotus Workflow Architect.
Start the Architect program (off start menu).
Go to File -> Open Databases...
Press the "New" button underneath the profile selection and type a profile name and press okay.
Underneath the "Data Source type:" area, there will be for database entries with x icons on the left.
Highlight each one, click browse, and specify each database you created in step 2 above.
When you are done the x icons will be replaced by check ones and it will look like the screen grab below.
6. Create a new process.
Click the new process icon on the tool bar or go to File -> New Process to create a new process.
Right click the blank workspace area and choose basic properties or go to Process -> Basic Properties
Give this new process a name.
In the Owner tab, enter the owners of the process. (Owners are one or more workgroups that monitor and manage the process from a user standpoint. There must be at least one.)
In the Initiators tab, select whethor or not you will let everyone begin the process or if you are specifying the initators in the process you are going to be diagramming.
In the Foms tab, under Main Document, select the form that will use this process. It is the form you created/customized back in step 4 above.
If the Timing tab, click the checkbox to enforce a schedule and use automatic overdue notices.
In the Description tab, enter a meaningful description for this process.
Press OK to return to the workspace.
Now we are ready to begin designing our workflow.
You build the workflow visually using the icons on the left toolbar.
Hints:
Use the Design Process help database to give you assistance for each of the individual elements.
Mine pieces of the sample process workflows to build your workflow until you know the elements and the Workflow formulas by heart. You can have multiple processes open at the same time and copy the elements from one to the other. However, copying the lines does not seem to work, only the object shapes copy and paste well.
When you are done, check your workflow syntax (Process -> Check Syntax...) and activate it (File -> Activate Process...).
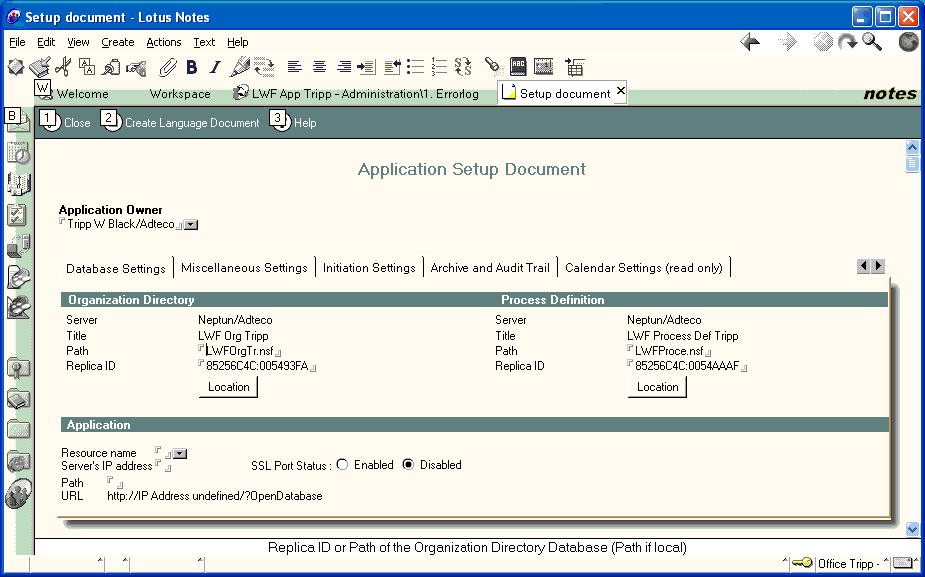
7. Setup the Application Database for the Process
Open the application database
Create the application setup document by choosing Application Setup under Administration in the outline menu on the left. (If it is not there, check your roles.)
In the Database Settings tab, complete the two sections specifying the organization and the processes design databases using the "Location" buttons.
In the Initiation Settings tab, specify the form(s) to use for the application.
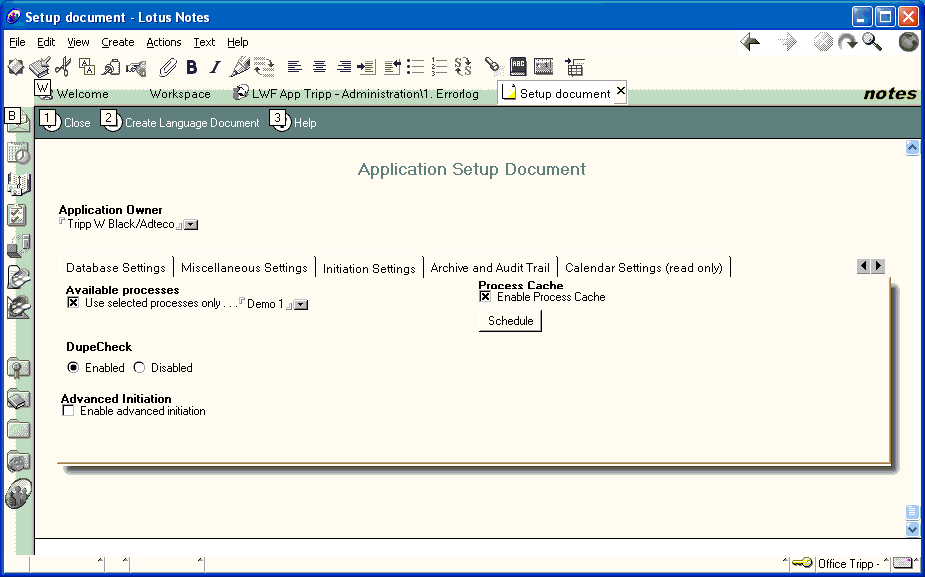
Close and save the setup document.
Create the Process Cache document. Otherwise the form(s) will not appear in the Start New Job area of the menu.
Switch to Cache still under Administration in the ouline of the menu.
Click the Update Process Cache button on the action bar of the view.
previous page
|